Petal Power Mandala
Aug 13, 2017
Nu ook verkrijgbaar in het Nederlands (scroll a.u.b. naar beneden)
Hooking hoops!
Last week a glorious package arrived in my mailbox, all the way from the Netherlands! It was full of plump, squishy lovelies from Scheepjes and I was bursting to get creating with them. Would you look at those colours! I think that pink on my knee is my fave.
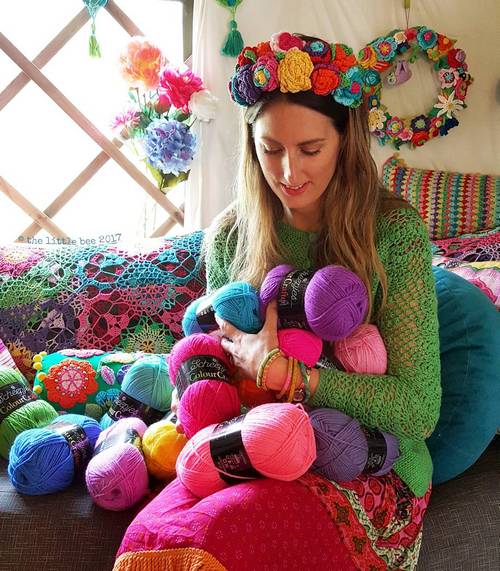
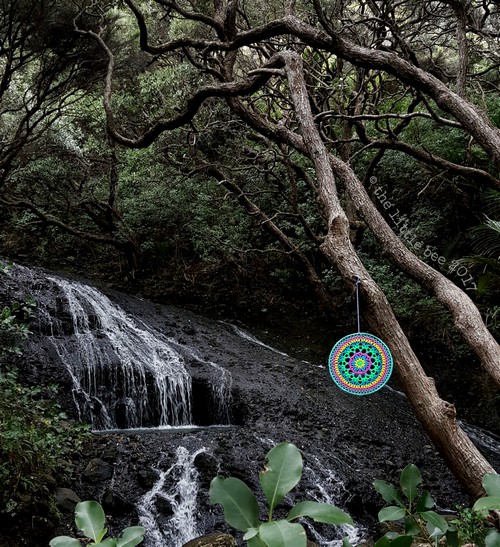
The plan was to use the Colour Crafter yarn to design a new hoop mandala to add to the collection hanging in the trees outside our home. The best yarn to use for this purpose is acrylic as it can handle all that nature has to throw at it, which lately has been plenty in terms of wind and rain, without disintegrating or fading.
Choosing colours always takes a long time for me. I lay the skeins out all over my bed and go back and forth pairing and switching colour combinations. If anyone happened to be watching I'm sure they'd be half asleep by the end of it! But good things take time...
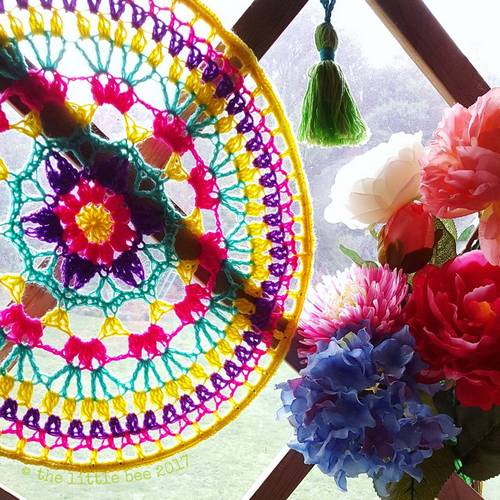
For the first mandala I settled on five colours - yellow (2008 Leuven), green (1259 Groningen), blue (1068 Den Helder), lilac (1084 Hengelo) & a beautiful minty blue/green (1422 Eelde) - don't they look fab together?!
Then it was 'design time'. My favourite. I was surprised at how fast this one came together, with not much in the way of frogging - I think I might actually be learning to consider the maths more carefully as I go!

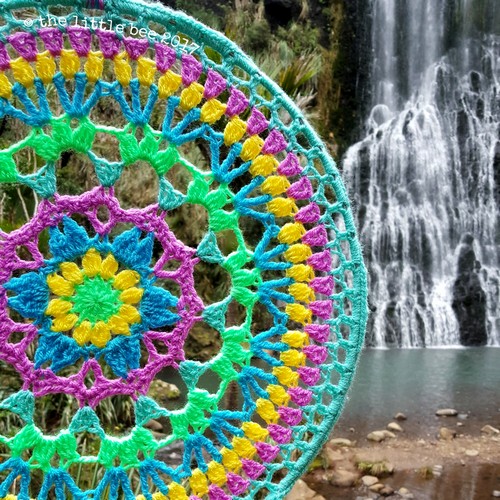
Yarn colours for the mandala above: yellow (2008 Leuven), hot pink (1257 Hilversum), purple (2003 Brugge), & that beautiful minty blue/green again (1422 Eelde).
So what do you think? Fancy hooking one up for yourself? Be careful - they can be addictive!
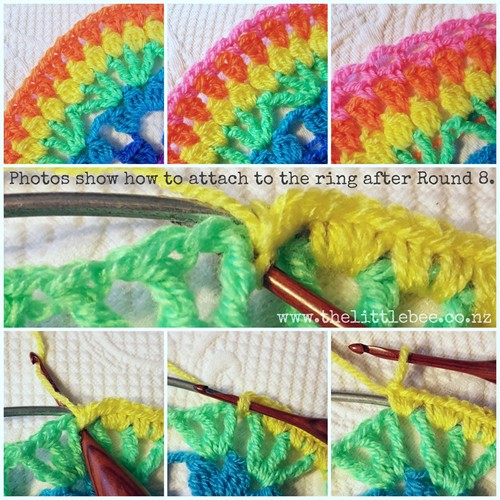
Below are the instructions and chart for the mandala pattern. You can crochet the mandala onto the hoop as I have, or you could also use a yarn needle to sew it on if you prefer...
Petal Power Mandala (US Terms)
Materials:
DK Yarn - Scheepjes Colour Crafter in a range of colours of your choice.
4mm hook
scissors
yarn needle
400mm steel craft hoop (you should be able to find these in a range of sizes at your local craft store. I bought mine from Spotlight in New Zealand)
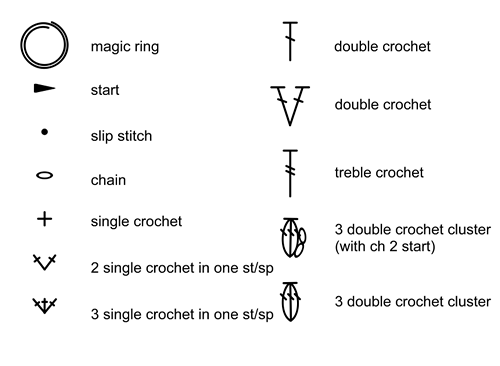
Abbreviations:
sl st - slip stitch
ch - chain
sc - single crochet
dc - double crochet
tr - treble
CL - cluster
3 dc CL - 3 double crochet cluster
st(s) - stitch(es)
sp(s) - space(s)
Special Stitches:
3 dc CL - *yarn over (YO), insert hook into stitch and pull back a loop, YO and pull through 2 loops (this is a partial dc stitch)* repeat this sequence twice more, YO once more and pull though all 4 loops on hook.

Pattern Instructions:
Notes: The mandala is worked in the round. Each new round is noted with the red dot and round number on the chart.
Almost every round is started with a new colour (if you wish) so fasten off and cut ends at the end of each round, unless instructed otherwise.
Leave weaving the ends until AFTER you've crocheted the mandala to the hoop as this stretches the mandala and can cause the ends to unravel or restrict the work from stretching evenly.
The outer rounds of this mandala can ruffle slightly, which disappears when the mandala is stretched onto the hoop.
Your finished mandala will be significantly smaller than the hoop. This is necessary and allows the mandala to sit taut within the hoop. If you wish to crop the mandala (or add further rounds) you will need to ensure that you have a decent space between the mandala (laid flat) and the ring (the size of this space changes depending on the size of the hoop). To test if the space is adequate, use stitch markers or scrap yarn to temporarily attach your mandala to the hoop at even intervals around the circumference - if your mandala is saggy, remove a round or two, and if you have to pull too hard to get it to fit, add an extra round or two).
* For the rainbow coloured mandala I added extra chain rounds after R12 continuing in the same fashion - e.g. R 12 is "ch 3, sc..." so an extension of this for the next row becomes "ch 4, sc..." and "ch 5, sc" for the following round until you reach the desired diameter.
Round 1:
Magic ring, ch 3 (counts as the first dc), 11 dc into the ring, join with a sl st to the first dc (3rd ch st), pull the tail to close
(12).
Round 2:
Join with a sl st in one of the dc sts, ch 2 (counts as first partial dc in 3 dc cluster) and complete cluster in the same st, *ch 1, 3 dc CL in the next st* repeat this sequence to the end of the round, join with a sl st to the top of the first CL.
(24)
Round 3:
Join with a sl st in any ch 1 space. *{sl st, ch 2, dc, tr, ch 2, tr, dc, ch 2, sl st} in the ch 1 sp, skip CL, 2 sc in next ch 1 sp, skip CL* repeat this sequence to the end of the round, join with a sl st in the first sl st.
(6 ‘petals’ & 12 sc)
Round 4:
Join with a sl st in the second of any of the 2 sc groups, ch 5 (counts as the first dc & ch 2), dc in the same st, *ch 1, skip {sl st, ch 2, dc, tr}, 2 sc in the ch 2 sp, ch 1, skip {tr, dc, 2 ch, sl st, sc}, [dc, ch 2, dc: v-st] in the next sc st* repeat this sequence to the end of the row, join with a sl st to the top of the first dc (3rd ch st). DO NOT CUT YARN (unless you want to change colours for the next round).
(6 v-st, 12 sc, 6 ch 1)
Round 5:
ch 1 (does not count), sc in the same st, 3 sc in ch 2 sp, sc the next st, sc in the ch 1 sp, sc in the next sc st, 2 sc in the next st, sc in the ch 1 sp, *sc in the next dc, 3 sc in the ch 2 sp, sc in the next dc, sc in the ch 1 sp, sc in the next st, 2 sc in the next sc, sc in the ch 1 sp* repeat this sequence to the end of the round, join with a sl st to the first sc.
(60 sc)
Round 6:
Join with a sl st in the middle st of one of the 3 sc groups, ch 3 (count as a dc), 2 dc in the same sp, ch 6, skip 4 sts, *3 dc in the next st, ch 6, skip 4 sts* repeat this sequence to the end of the round, join with a sl st to the first dc st (3rd ch st).
(12 x 3dc, 12 x ch 6)
Round 7:
Join with a sl st in one of the ch 6 spaces, ch 2 (counts as first partial dc in 3 dc cluster) and complete cluster in the same st, {ch 1, 3 dc CL, ch 1, 3 dc CL} in the same sp, ch 3, skip 3 dc, *{3 dc CL, ch 1, 3 dc CL, ch 1, 3 dc CL} in the next ch 6 sp, ch 3, skip 3 dc* repeat this sequence to the end of the round, join with a sl st to the top of the first CL.
(12 x {3 dc CL/ch 1/ 3dc CL/ch1 / 3dc CL} groups, 12 x ch 3)
Round 8:
Join with a sl st in the first ch 1 sp of one of the cluster groups, ch 5 (count as tr ch 1), {tr, ch 1, tr} in the same sp, skip CL, {tr, ch 1, tr, ch 1, tr} in the next ch 1 sp, skip ch 3, *{tr, ch 1, tr, ch 1, tr} in the next ch 1 sp, skip CL, repeat {..}, skip ch 3* repeat this sequence to the end of the round, join with a sl st to the top of the first tr (4th ch st).
(72 tr, 48 ch)
Round 9:
The stitches in this round are worked into the ch 1 spaces and the gap between the central 2 tr stitches in each tr/ch1 group). The tr stitches are ignored/skipped in this round.
Join with a sl st in the first ch 1 in one of the tr/ch 1… groups, ch 2 (counts as first partial dc in 3 dc cluster) and complete cluster in the same sp, ch 1, 3 dc CL in the next ch 1 sp, ch 1, 3 dc CL in the gap between the next 2 tr sts, ch 1, {3 dc CL, ch 1} in each of the next 2 ch 1 sps, *{3 dc CL, ch 1} in the next 2 ch 1 sps, 3 dc CL in the gap between the next 2 tr sts, ch 1, {3 dc CL, ch 1} in each of the next 2 ch 1 sps* repeat this sequence for each of the {tr/ch 1, tr…} groups, join with a sl st to the top of the first CL.
(60 x 3 dc CL, 48 ch)
Round 10:
The stitches in this round are worked into the ch 1 spaces and the gap between the last CL of a group and the first CL of the next group. The CL stitches are ignored/skipped in this round.
Join with a sl st in the first ch 1 sp of one of the {CL, ch 1…} groups, ch 3 (count as dc), dc in the same sp, 2 dc in each of the next 3 ch 1 sps, *2 dc in the gap between the last CL and the first CL of the next group, 2 dc in each of the next 4 ch 1 sps8 repeat this sequence to the end of the round, join with a sl st to the first dc (3rd ch).
(120 dc)
Round 11:
The stitches in this round are worked in the spaces between the 2 dc groups. The tops of the dc stitches are ignored.
Join with a sc in one of the gaps between two 2 dc groups, ch 2, skip the tops of the next 2 dc sts, sc in the gap before the next 2 dc group, ch 2* repeat this sequence to the end of the round, join with a sl st to the first sc.
(60 sc, 60 ch 2)
Round 12:
Join with a sc in one of the ch 2 sps, ch 3, skip sc, *sc in the next ch 2 sp, ch 3, skip sc* repeat this sequence to the end of the round, join with a sl st to the first sc.
(60 sc, 60 ch 3)
Round 13:
This round joins the mandala to the hoop. The stitches are worked as you normally would, except you hold the mandala in line with, and in front of the steel hoop. Insert your hook into the stitch, AROUND the inside edge of the hoop from the front to the back. The working yarn is held at the top edge of the hoop and is picked up by the hook at the back edge. The sc stitch is completed as you normally would, giving a little tug to keep the stitch tight before beginning the next sc stitch.
Join with a sc in one of the ch 3 sps, 5 sc in the same sp, skip sc, *6 dc in the next ch 3 sp, skip sc* repeat this sequence to the end of the round, join with a sl st to the first sc st.
(360 sc)

Now is the time to weave in the ends and create a plaited rope to hang the mandala to the tree. To make the rope, gather 3 colours of yarn (from your mandala) and cut 2 x lengths approx. 1m long from each colour. Hold the strands together evenly and fold them in half. Poke the folded end into a gap in the last round of your mandala and thread the tails back through the loop, around the hoop, and pull tight (or simply tie them on if it is easier). Proceed to plait the rope, finish with a knot and trim the ends. Find a tree branch to hang your mandala from and enjoy the happiness it brings as it moves and sways with the breeze.
So there you have it! I'd LOVE to see your creations - please remember to tag me in your photos on Facebook & Instagram and use the hashtag #petalpowermandala so that others can find your beauties too!
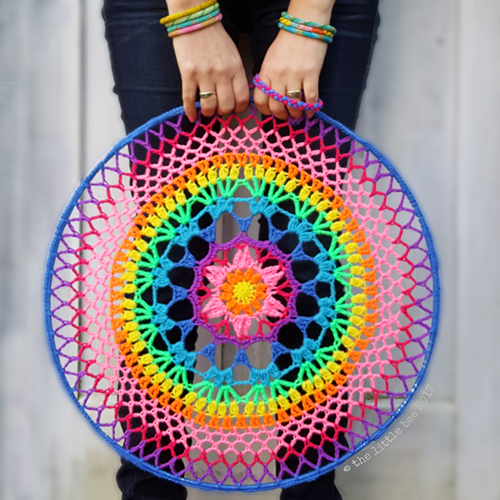
Colours for rainbow mandala: yellow (2008 Leuven), orange (1256 Te Hague), pink (2013 Mechelen), dark pink (1435 Apeldoorn), purple (2003 Brugge), dark blue (2011 Geraardsbergen), med blue (1068 Den Helder), bright green (1259 Groningen).
~~~~~~~~~~~~~~~~~~~~~~~~~~~~~~~~~~~~~~~~~~~~~~~~~~~~~~~~~~~~~~~~~~~~~~~~
haakpatroon ( Nederlandse vertaling)
Ontwerp:Alia Bland van The Little Bee
Vertaling:Ellen van den Barg
Materialen:
Dk garen – Scheepjes Colour Crafter, kleur naar keuze.
4 mm. Haaknaald.
Schaar.
Naald.
Metalen hobby ring 40 cm.
Gebruikte kleuren afbeelding: geel (2008 leuven), oranje (1256 den haag), roze (2013 mechelen), donker roze (1435 apeldoorn), paars (2003 brugge), donkerblauw (2011 geraardsbergen), midden blauw ( 1068 den helder), helder groen (1259 groningen).
Gebruikte Steken:
hvhalve vaste
llosse
vvaste
ststokje
dstdubbelstokje
clcluster
3st CL cluster van 3 stokjes
stksteek
rruimte
Speciale Steken:
3 st CL *draad omslaan, insteken en draad door steek halen, draad omslaan en haal door 2 lussen (gedeeltelijk stokje) * herhaal wat tussen ** staat 2 keer, draad omslaan en haal door 4 lussen.
Instructies:
De mandala wordt in het rond gehaakt. Elke nieuwe toer is aangegeven met een rode stip en toernummer. Bijna elke toer wordt gestart met een nieuwe kleur (als je dat wilt) dus hecht af aan het eind van de toer, tenzij anders aangegeven. Werk de afgehechte draadjes pas weg nadat je de mandala in de ring gehaakt hebt. De buitenste toeren van de mandala kunnen een beetje gaan bobbelen. Dit verdwijnt met het opspannen.
De mandala is aanzienlijk kleiner dan de ring. Dit is nodig om de mandala strak in de ring te maken. Als je de mandala kleiner of groter wilt maken zorg er dan voor dat je genoeg ruimte hebt tussen de mandala en de ring. Om te testen of de ruimte voldoende is, gebruik dan steekmarkeerders of maak met strengetjes garen de mandala tijdelijk vast in de ring met gelijke interval. Als de mandala een beetje uitzakt, haal dan 1 of 2 toeren uit. Moet je te hard trekken om het passend te maken, haak 1 of 2 toeren erbij.
Toer 1:
Magische ring, 3 l, (= 1e st), 11 st in de ring, sluit met een hv in het eerste st (in de 3e losse), sluit de ring.
(12)
Toer 2:
Hecht aan met een hv in één van de st, 2 l (= gedeeltelijk stokje van de 3 st CL) en maak in dezelfde steek de cl af. * l, 3 st CL in de volgende stk *. Herhaal ** tot het eind van de toer. Sluit de toer met een hv in de top van de eerste cl.
(24)
Toer 3:
Hecht aan met een hv in één van de losseruimte. * { hv, 2 l, st, dst, 2 l, dst, st, 2l, hv } in de losseruimte, sla cluster over, 2 v in volgende losseruimte, sla cluster over *. Herhaal ** tot het eind van de toer, sluit de toer met een hv in de eerste hv.
(6 blaadjes, 12 vasten)
Toer 4:
Hecht met een hv aan in de 2e v in één van de 2v groepjes. 5 lossen (=1e st en 2 l), st in dezelfde stk, * 1 l, sla { hv, 2 l, st, dst, } over, 2 v in de 2lossenruimte, 1 l, sla { dst, st, 2l, hv, v} over [ st, 2 l, st = Vstk] in de volgende v *. Herhaal ** tot het eind van de toer. Sluit de toer met een hv in de 3e l (1e st). Knip de draad niet af tenzij je de volgende toer van kleur wilt wisselen.
(6 v-st, 12 v, 6x 1 l.)
Toer 5:
1 l (telt niet mee), 1 v in dezelfde steek, 3 v in de 2lossenruimte, v in de volgende stk, v in de 1losseruimte, v in de volgende v, 2 v in de volgende stk, v in de volgende 1 losseruimte, * v in het volgend st, 3 v in de 2lossenruimte, v in het volgend st, v in de 1 losseruimte, v in de volgende stk, 2 v in de volgende v, v in de 1losseruimte, * Herhaal ** tot het eind van de toer. Sluit met een hv in de eerste v.
(60 c)
Toer 6:
Hecht met hv aan in de middelste stk van één van de 3v groepjes, 3 l (=1e st), 2 st in dezelfde stk, 6 l, sla 4 stk over, * 3 st in de volgende stk, 6 l, sla 4 stk over *. Herhaal ** tot het eind van de toer. Sluit met een hv in de 3e l (1e st).
(12x 3st, 12x 6 l.)
Toer 7:
Hecht met een hv aan in één van de 6 lossenboogjes, 2 l (=gedeeltelijk st van de 3 st CL) en maak de cluster af in dezelfde steek. { 1 l, 3 st CL, 1 l, 3 st CL} in dezelfde ruimte, 3 l, sla 3 st over, * { 3 st CL, 1 l, 3 st CL, 1l, 3 st CL} in de volgende 6lossenruimte, 3 l, 3 st overslaan *. Tussen ** herhalen tot eind van de toer en sluit met een hv in de top van de eerste 3 st CL.
(12x {3 st CL, 1l, 3 st CL, 1l, 3 st CL} groepjes, 12x 3l.)
Toer 8:
Hecht aan met hv in de eerste 1 losseruimte van één van de clustergroepjes, 5 lossen (= 1 dst en 1 l), { dst, 1l, dst} in dezelfde ruimte, sla CL over, {dst, 1l, dst, 1l, dst} in de volgende losseruimte, sla 3 l over, *{dst, 1l, dst, 1l, dst} in de volgende losseruimte, sla cluster over, herhaal { }, sla 3 l over *
Herhaal ** tot het eind van de toer. Sluit met een hv in het 1e dst (4e l).
(72 dst, 48 l).
Toer 9:
De steken in deze toer worden gemaakt in de lossenruimtes en in de ruimte tussen de middelste 2 dst van elk dst/1l groepje. De dst worden in deze toer overgeslagen.
Hecht aan met een hv in de eerste 1losseruimte van het dst/l groepje, 2 l (= gedeeltelijk st van de 3st CL) en maak de CL af in dezelfde ruimte, 1l, 3 st CL in de volgende 1losseruimte, 1 l, 3 st CL in de ruimte tussen de volgende twee dubbele stokjes, 1 l, { 3 st CL, 1 l} in de volgende twee 1losseruimtes, *{ 3 st CL, 1l} in de volgende twee 1losseruimtes, 3 st CL in de ruimte tussen de volgende 2 dst, 1 l, { st CL, 1l} in de volgende twee 1losseruimtes*. Herhaal dit bij elk {dst, 1l, dst} groepje. Sluit de toer met een hv in de top van de CL.
(60x 3 st CL, 48 l)
Toer 10:
De steken in deze toer worden gemaakt in de lossenruimtes en in de ruimte van de laatste cluster van een groep en de eerste cluster van de volgende groep. De clusters worden in deze toer overgeslagen.
Hecht aan met een hv in de eerste losseruimte van één van de { 3 st CL, 1 l} groepjes, 3 l (= 1e st), st in dezelfde ruimte, 2 st in elk van de volgende drie lossenruimtes, * 2 st in de ruimte tussen de laatste CL en de eerste CL van het volgende groepje, 2 st in elk van de vier lossenruimtes*. Herhaal ** tot het eind van de toer. Sluit de toer met een hv in het eerste st (3e l).
(120 st)
Toer 11:
De steken in deze toer worden gemaakt tussen de 2 st groepjes. De st worden overgeslagen.
Hecht aan met een v in één van de ruimtes tussen de 2 st groepjes, 2 l, sla 2 st over, * vaste in de ruimte voor het volgende 2 st groepje, 2 l * . Herhaal ** tot het eind van de toer en sluit de toer met een hv in de eerste v.
(60 v, 60 2l)
Toer 12:
Hecht aan met een v in één van de 2 lossenruimtes, 3 l, sla 1 v over, * v in de volgende 2lossenruimte, 3 l, sla vaste over *. Herhaal ** tot het eind van de toer. Sluit de toer met een hv in de eerste v.
(60 v, 60 3l)
Toer 13:
Deze toer verbindt de mandala aan de ring. Je haakt de steken zoals gebruikelijk behalve dat je nu ook om de ring haakt. Gaat als volgt: insteken met je haaknaald in een steek en onder de ring door, leg draad over de ring, haal de draad onder de ring en door de steek op naar voren, haal dan de draad over de ring op naar voren en haal de draad door de lussen op je naald. Trek de steekjes een beetje strak aan.
Hecht aan met een v in één van de 3lossenruimtes, 5 vasten in dezelfde ruimte, sla vaste over, * 6 vasten in de volgende 3lossenruimte, sla v over *. Herhaal ** tot het eind van de toer. Sluit de toer met een hv in de eerste v.
(360 v)
Hecht nu alle draadjes af.
Je kunt ipv de mandala rechtstreeks aan de ring te haken ook met naald en draad vast naaien. Haak de ring dan eerst met vasten om.
~~~~~~~~~~~~~~~~~~~~~~~~~~~~~~~~~~~~~~~~~~~~~~~~~~~~~~~~~~~~~~~~~~~~~~~~
Happy hooking, everyone.
Alia x
Add Pingback blog comments powered by Disqus